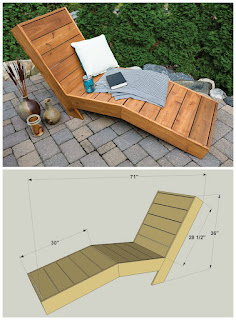
Free Woodwork Projects for Quick and Affordable Builds

Free Woodwork Projects for Quick and Affordable Builds

The allure of woodworking lies not only in the creation of beautiful and functional pieces but also in the inherent satisfaction of transforming raw materials into something tangible and useful. However, the perceived cost and time commitment often deter aspiring woodworkers. This article dispels that notion by presenting a curated selection of free woodworking projects designed for quick construction and minimal financial outlay. These projects are perfect for beginners, allowing them to hone their skills without substantial investment while simultaneously furnishing their homes with handcrafted items.

Beginner-Friendly Projects: Minimal Tools, Maximum Impact

Embarking on your woodworking journey shouldn't require a fully equipped workshop. Many rewarding projects can be completed using a limited set of tools commonly found in most households. These beginner-friendly projects focus on simplicity and practicality, emphasizing the learning process over complex techniques.

1. Simple Shelf Unit

A basic shelf unit is a versatile project ideal for beginners. This requires minimal cuts and straightforward assembly. Materials: Untreated pine boards (easily sourced from most hardware stores), wood glue, and screws. Tools: Measuring tape, saw (hand saw or circular saw), drill, screwdriver. This project teaches essential skills such as accurate measuring, cutting, and screwing. The finished product can be used in various locations, from the kitchen to a garage.

2. Rustic Coasters

These charming coasters are a fantastic introduction to woodworking, particularly for those focusing on smaller projects. The simplicity of the design allows for creativity in material selection and finishing. Materials: Scraps of hardwood, wood glue, sandpaper. Tools: Saw (hand saw or jigsaw), sandpaper, optional finishing materials (e.g., varnish, stain). This project introduces the concepts of surface finishing and the importance of proper sanding for a smooth, professional-looking finish. Experimenting with different wood types or adding decorative elements adds a personal touch.

3. Key Holder

A functional key holder is another quick and easy project that provides a sense of accomplishment. This project allows for creative design variations, from simple geometric shapes to more intricate carvings. Materials: A small piece of plywood or hardwood, screws, key hooks. Tools: Drill, screwdriver, sandpaper, optional finishing materials (e.g., paint, stain). This project introduces the use of pre-made components and focuses on accurate drilling and screwing.

Intermediate Projects: Expanding Your Skillset

Once you've mastered the basics, you can progress to slightly more challenging projects that incorporate more complex techniques and designs. These intermediate projects build upon the foundational skills learned in the beginner projects, introducing new challenges and opportunities for creative expression.

1. Small Wooden Box

Constructing a small wooden box enhances your joinery skills and introduces the concept of precise measurements and fitting. This project involves miter cuts or rabbet joints, depending on the chosen design. Materials: Pine or hardwood boards, wood glue, small hinges, and optional latch. Tools: Miter saw (or hand saw for a greater challenge), clamps, sandpaper, finishing materials. This project teaches the fundamentals of box construction, including precise cutting, joinery techniques, and hinge installation.

2. Simple Picture Frame

Crafting a picture frame allows you to showcase your skills in accurate cutting, joinery, and finishing. The project's customization potential allows for personal expression through the choice of wood and embellishments. Materials: Wooden strips, miter box (optional), wood glue, small nails or brads, and glass or plexiglass. Tools: Miter saw or hand saw, clamps, sandpaper, finishing materials. This project emphasizes precision cutting and assembling at 45-degree angles for a neat, professional frame.

3. Birdhouse

Building a birdhouse offers a rewarding experience, combining construction with a touch of nature. This project provides an opportunity to apply various joinery techniques and explore design variations to suit different bird species. Materials: Untreated pine boards, wood glue, screws, and optional paint or stain. Tools: Saw, drill, screwdriver, sandpaper. This project incorporates a variety of skills, including cutting, assembly, and potentially the creation of more complex shapes.

Advanced Projects: Challenging Yourself Further

As your confidence and skill set grow, more ambitious projects become attainable. These projects require careful planning, precise execution, and a deeper understanding of woodworking techniques. They are excellent for pushing your boundaries and honing your mastery of the craft.

1. Small Coffee Table

A coffee table demands meticulous planning and execution, encompassing various joinery techniques and a focus on structural integrity. This project provides valuable experience in designing and constructing larger furniture pieces. Materials: Hardwood boards (oak or maple are recommended), wood glue, screws, dowels (optional), wood finish. Tools: Various saws (circular saw, jigsaw), drill, clamps, sandpaper, finishing tools. This project introduces more complex joinery, advanced structural considerations, and the need for precise alignment during assembly.

2. Simple Garden Bench

A garden bench presents a significant challenge, requiring a combination of woodworking skills and a robust understanding of structural design to ensure durability. This project is an ideal platform to showcase advanced joinery and finishing techniques. Materials: Pressure-treated lumber or hardwood, wood screws, bolts, wood glue. Tools: Various saws, drill, impact driver, clamps, sandpaper, wood finish. This project involves complex joinery and a considerable amount of woodworking skills to achieve stability and longevity.

3. Custom Bookshelf

A custom bookshelf is a project that allows for complete personalization in terms of size, design, and functionality. This project encourages creative problem-solving and reinforces many of the techniques learned in previous projects. Materials: Your choice of wood, wood glue, screws, dowels (optional), shelves, finishing materials. Tools: Various saws, drill, router (optional), clamps, sandpaper, finishing tools. This project reinforces several skills, from cutting and joinery to the construction of a multi-component structure that must meet specific functionality requirements.

Remember, safety is paramount in any woodworking project. Always wear appropriate safety gear, including eye protection, hearing protection, and dust masks. Take your time, plan carefully, and enjoy the rewarding process of transforming wood into beautiful and functional objects.

Share:

Functional and Stylish Aquarium Furniture Plans for DIY Builders

Functional and Stylish Aquarium Furniture Plans for DIY Builders

The allure of a home aquarium is undeniable. However, integrating a tank seamlessly into one's living space often necessitates custom furniture solutions. Pre-fabricated stands often lack the aesthetic appeal or functional versatility desired. This comprehensive guide provides detailed plans and considerations for constructing functional and stylish aquarium furniture, empowering DIY enthusiasts to create bespoke pieces that perfectly complement their aquariums and interior design.

Planning Your Aquarium Furniture Project

Before embarking on construction, meticulous planning is paramount. This phase encompasses several crucial steps:

Assessing Your Aquarium and Space

The first step involves accurately determining the dimensions of your aquarium, including its weight when filled with water, substrate, and décor. This weight is critical for calculating the structural requirements of the stand. Consider the aquarium's location, factoring in ceiling height, available floor space, and surrounding furniture. Measure the area carefully and sketch a preliminary design incorporating the aquarium's dimensions and desired aesthetic.

Choosing Materials

Material selection significantly impacts the furniture's durability, aesthetic, and cost. Pressure-treated lumber offers exceptional strength and resistance to moisture, crucial for aquarium stands. However, it requires careful sealing to prevent leaching of chemicals into the water. Marine-grade plywood is another excellent option, known for its water resistance and stability. MDF (Medium-Density Fiberboard), while less water-resistant, can be used with appropriate sealing and is often preferred for its smooth finish and ease of working. Consider the overall style and desired finish when selecting materials.

Designing for Functionality and Aesthetics

The design should prioritize both functionality and aesthetics. Functional aspects include ample storage for aquarium supplies, filter equipment, and lighting components. Consider incorporating easily accessible compartments for regular maintenance tasks. Aesthetics involve choosing a style that complements the existing décor. Explore various design elements such as built-in lighting, open shelving, and decorative moldings to enhance the overall visual appeal. Sketch multiple design iterations and refine them based on practicality and aesthetics.

Creating Detailed Plans

Develop comprehensive plans that include detailed dimensions, material lists, and step-by-step construction instructions. Include diagrams and specifications for each component, such as the frame, shelves, doors, and any decorative elements. This detailed approach minimizes errors and ensures a smooth construction process. Utilizing CAD software can greatly enhance the planning process, allowing for precise measurements and visualization of the final product.

Construction Techniques and Considerations

The construction phase demands meticulous attention to detail and adherence to safe practices. The following sections outline essential considerations and techniques.

Building a Robust Frame

The frame forms the structural backbone of the aquarium stand, requiring robust construction to support the substantial weight of the aquarium and its contents. Employ strong joinery techniques such as mortise and tenon joints, dado joints, or robust pocket hole joinings for maximum strength and stability. Reinforce critical joints with additional screws or bolts, ensuring the frame is capable of withstanding significant loads. Use level and plumb bobs regularly to ensure the frame is square and level throughout the construction process.

Creating Functional Compartments

Compartmentalization enhances the functionality of the aquarium stand, providing dedicated space for different items. Design compartments of varying sizes to accommodate filters, heaters, testing kits, and other equipment. Consider incorporating pull-out drawers or shelves for easy access. Ensure sufficient ventilation within the compartments to prevent overheating of electrical components. Use dividers and bracing to create sturdy and organized storage spaces.

Finishing and Sealing

Proper finishing and sealing are crucial for protecting the wood from moisture damage. Sand all surfaces smoothly to remove any imperfections. Apply a high-quality waterproof sealant or varnish in multiple coats, allowing each coat to dry completely before applying the next. This process ensures longevity and prevents water damage that could compromise the structural integrity of the stand. Choose a finish that complements the overall aesthetic, while ensuring water resistance.

Incorporating Decorative Elements

Elevate the aquarium stand's aesthetic appeal by incorporating decorative elements. Consider adding crown molding, decorative trim, or custom-designed handles. A well-chosen finish, such as a stained and varnished wood finish or a painted surface, can significantly enhance its visual appeal. Integrating subtle lighting features can add a sophisticated touch, showcasing the aquarium and its inhabitants in a more dramatic way.

Advanced Aquarium Furniture Designs

For advanced DIY enthusiasts, more elaborate designs are achievable. These incorporate increased functionality and refined aesthetics.

Built-in Lighting Systems

Integrate LED lighting strips into the stand's design to provide ambient illumination for the aquarium and surrounding area. Ensure proper wiring and safety measures are implemented to prevent electrical hazards. Consider using dimmable lights to control the intensity and create different moods.

Custom Cabinetry with Integrated Features

Incorporate custom cabinetry with features such as built-in water testing stations, dedicated spaces for filter media storage, and hidden compartments for aquarium maintenance supplies. Careful planning is crucial to ensure adequate space and accessibility.

Matching Aquarium Hoods and Canopies

Design and construct a matching canopy or hood for the aquarium to create a cohesive and unified aesthetic. This can incorporate features such as integrated lighting, ventilation, and even a small viewing window for observing the inhabitants without disturbing them.

Safety Precautions

Safety must be paramount throughout the entire project. Always follow proper safety procedures when working with power tools. Ensure the stand is robust enough to support the aquarium's weight, and always use proper lifting techniques when moving the completed stand. Regularly inspect the stand for signs of damage or wear and tear, and promptly address any issues. Ensure electrical wiring is properly insulated and conforms to safety standards.

Constructing custom aquarium furniture is a rewarding project that allows for personalized design and functionality. By following these detailed plans and employing safe construction practices, DIY enthusiasts can create stunning and functional pieces that enhance both the aesthetic and practical aspects of their home aquariums.

Share:

Beginner Woodwork Projects to Kickstart Your Crafting Journey

Beginner Woodwork Projects to Kickstart Your Crafting Journey

Stepping into the world of woodworking can feel daunting, but it doesn't have to be! With the right approach and a few carefully chosen projects, you can quickly build confidence and skills. This guide focuses on simple, achievable projects perfect for beginners, encouraging you to explore the satisfying process of transforming raw wood into beautiful, functional items. Forget complex joinery and intricate designs; we're starting with the fundamentals, laying a strong foundation for future, more ambitious creations.

Simple Shelves: A Foundation for Success

Building shelves is a fantastic introductory project. It teaches you essential skills like measuring accurately, cutting wood cleanly, and using basic fasteners. Start with a small, straightforward design. A single, floating shelf is an excellent choice. You'll learn to use a level to ensure proper placement, practice using screws and a screwdriver, and appreciate the clean lines of a simple, well-crafted piece. Remember to select appropriately sized wood; a single 1x6 or 1x8 board is perfect for a smaller shelf. Sanding is crucial for a smooth finish; take your time here to achieve a professional look. Once complete, admire your first successful woodworking project!

Materials You'll Need:

  • One piece of wood (1x6 or 1x8, length determined by desired shelf size)
  • Screws
  • Wall anchors (appropriate for your wall type)
  • Wood glue (optional)
  • Sandpaper (various grits)
  • Level
  • Measuring tape
  • Drill or screwdriver

A Charming Coasters Set: Mastering Precision

This project refines your cutting and sanding skills while introducing the satisfaction of creating a functional, aesthetically pleasing set. Choose a hardwood like cherry or maple for a more durable and visually appealing coaster. You can create simple square or round coasters, or explore more interesting shapes with the help of templates. Remember to carefully measure and cut your wood, ensuring straight edges and consistent dimensions. Precise sanding is key for a smooth, comfortable surface. Consider adding a protective finish, such as a food-safe oil or varnish, to safeguard your coasters and enhance their longevity. This project emphasizes precision and attention to detail, vital skills for any woodworker.

Tips for Success:

  • Use a sharp blade: A dull blade will result in uneven cuts.
  • Sand in stages: Start with coarser grit sandpaper and gradually move to finer grits for a super smooth finish.
  • Apply multiple thin coats of finish: This prevents runs and ensures even coverage.

Rustic Wooden Box: Embracing Basic Joinery

Ready for a slightly more challenging project? Constructing a simple wooden box introduces basic joinery techniques. You can opt for a mitered corner join, using wood glue and brads or small nails to secure the joints. Alternatively, a simpler rabbet joint is a great option for beginners. This project requires careful measurement and precise cutting to ensure the box's sides fit together snugly. Remember to consider the desired size and style of your box, choosing wood that reflects your aesthetic preference. Once assembled, consider staining or painting the box for a unique look. This project builds upon previous skills, offering a more substantial and rewarding woodworking experience.

Choosing Your Wood:

  • Pine: A softwood that's easy to work with, affordable, and readily available.
  • Oak: A hardwood that's more durable and offers a beautiful grain.
  • Cherry: A rich hardwood with beautiful reddish-brown tones.

These three projects provide a solid foundation for your woodworking journey. As you gain confidence, you can explore more complex techniques and designs. Remember to prioritize safety, always wearing appropriate safety gear, and enjoy the process of creation! Happy woodworking!

Share:

Free Simple Woodworking Projects for a DIY Home Makeover

Free Simple Woodworking Projects for a DIY Home Makeover

Embarking on a home makeover can be both exciting and daunting. The cost of professional renovations can be prohibitive, but a resourceful homeowner can achieve significant improvements through the application of simple woodworking techniques. This article details several free, readily accessible woodworking projects suitable for individuals with varying skill levels, contributing to a stylish and personalized home environment without breaking the bank.

Beginner-Friendly Projects: Perfect for Novices

For those new to woodworking, starting with smaller, less complex projects builds confidence and familiarity with basic tools and techniques. These introductory projects require minimal tools and materials, often utilizing readily available scrap wood.

1. Simple Floating Shelves: Maximizing Space and Style

Floating shelves are an excellent way to add functional storage and visual appeal to any room. This project utilizes two equally sized pieces of wood for the shelf and a pair of sturdy brackets, hidden behind the shelf for a clean aesthetic. Materials required: Two pieces of wood (preferably hardwood for durability), two shelf brackets (matching the wood's style and weight capacity), screws, wood glue, and sandpaper. Instructions: Measure and cut the wood to your desired length, ensuring both pieces are identical. Lightly sand the edges for smoothness. Attach the brackets to the wall, ensuring they are level. Carefully position the shelf onto the brackets, securing it with screws. A simple coat of stain or paint can personalize the finish.

2. Rustic Coasters: Adding Charm to Everyday Life

These charming coasters are ideal for beginners, requiring only scraps of wood and a simple finishing technique. This project is an excellent opportunity to experiment with different wood stains or paints, matching them to your existing décor. Materials required: Scraps of wood (approximately 4 inches square), sandpaper, wood glue, wood stain or paint, and a sealant (optional). Instructions: Cut the wood into squares of your desired size. Sand the edges to smooth any rough areas. Apply wood stain or paint, allowing adequate drying time. For enhanced durability, apply a sealant. These coasters add a personal touch to any coffee table or side table.

3. Key Holder: A Functional and Decorative Entryway Accessory

A simple key holder not only provides a designated place for your keys, but also adds a decorative element to your entryway. This project is straightforward and allows for creative expression through unique designs and paint schemes. Materials required: A piece of wood (approximately 6 inches by 12 inches), hooks (quantity depends on the number of keys to be hung), screws, sandpaper, and paint or stain. Instructions: Sand the wood piece smooth. Paint or stain the wood to your desired color. Once dry, attach the hooks at evenly spaced intervals along the top of the wood piece. This project can be easily mounted on the wall using screws or adhesive.

Intermediate Projects: Expanding Your Woodworking Skills

Once comfortable with basic techniques, you can move on to projects that require slightly more skill and precision. These projects often involve more complex cuts and joinery techniques, helping to hone your woodworking abilities.

4. Simple Wooden Planter Box: Bringing the Outdoors In

A wooden planter box adds a touch of nature to any indoor or outdoor space. This project requires careful measurement and cutting, alongside the assembly of the box using basic joinery methods. Materials required: Wooden boards (depending on the desired size of the planter), screws, wood glue, sandpaper, and exterior-grade sealant (for outdoor use). Instructions: Cut the wooden boards to the correct dimensions for the sides, bottom, and optional dividers. Assemble the box using wood glue and screws, ensuring tight joints. Sand the exterior smooth. Apply a sealant to protect the wood from the elements (if using outdoors). This project can be customized with decorative elements like paint or stain.

5. Small Wooden Storage Box: Organizing with Style

A small wooden storage box is a versatile project suitable for holding a variety of items, from jewelry to office supplies. This project introduces the concept of miter cuts and box joints, enhancing woodworking expertise. Materials required: Wooden boards (for the sides, bottom, and lid), hinges, sandpaper, wood glue, screws, and optional decorative elements. Instructions: Cut the wood pieces to the correct dimensions for the box and lid using miter cuts or box joints. Assemble the box using wood glue and screws. Attach the hinges to connect the lid securely. Sand the exterior smooth. This box can be stained, painted, or left with a natural finish.

Advanced Projects: Challenging Yourself with More Ambitious Designs

More advanced projects require a greater understanding of woodworking techniques and the use of more specialized tools. These projects offer a significant reward in the form of uniquely crafted pieces that elevate the home's aesthetic appeal.

6. A Simple Wooden Bench: A Functional and Stylish Addition

A wooden bench is a substantial project that requires precise planning and execution. This project involves constructing a sturdy frame, attaching the seat, and possibly adding a backrest. Materials required: Longer pieces of lumber (for the legs and frame), shorter pieces (for the seat), screws, wood glue, wood stain or paint, sandpaper, and possibly wood dowels for added strength. Instructions: Cut the lumber to size based on a pre-planned design. Assemble the frame using strong joinery methods. Attach the seat slats or solid top. Sand and finish with your desired stain or paint. The bench can be further personalized with unique design features.

7. Custom-Sized Bookshelf: Tailored Storage for Your Needs

A custom bookshelf allows for personalized organization of books and other items. This project involves intricate measurements, precision cutting, and the use of more advanced joinery techniques such as mortise and tenon joints or dado joints. Materials required: Wooden boards (various lengths and thicknesses depending on the size and design), screws, wood glue, wood stain or paint, sandpaper, and possibly shelf supports. Instructions: Draw a detailed plan outlining the shelf's dimensions and the placement of shelves. Cut the boards precisely according to the plan. Assemble the frame using the chosen joinery method. Install the shelves, ensuring they are securely fixed. Sand and finish with your preferred stain or paint.

Remember to always prioritize safety when working with woodworking tools. Wear appropriate safety glasses and hearing protection. Take your time, follow the instructions carefully, and enjoy the process of creating beautiful, functional additions to your home.

Share:

Simple Beginner Woodworking Projects for DIY Enthusiasts

Unleash Your Inner Carpenter: Simple Woodworking Projects for Beginners

Stepping into the world of woodworking can feel daunting, but it doesn't have to be! With a little patience and the right tools, you can create beautiful and functional pieces that you'll be proud to display. This guide focuses on beginner-friendly projects that require minimal experience and readily available materials, perfect for igniting your passion for DIY craftsmanship. Forget complicated joinery and intricate designs—we're focusing on building confidence and having fun!

Project 1: The Classic Coasters

Start your woodworking journey with a project that's both practical and aesthetically pleasing: coasters! These require minimal tools and materials, making them ideal for first-timers. You'll learn basic cutting and sanding techniques while producing something you'll use every day. Choose a visually appealing wood like maple or cherry for a polished look, or opt for a more rustic feel with pine or reclaimed wood.

Materials You'll Need:

  • Wood (choose a thickness of ½ inch or ¾ inch)
  • Circular saw or hand saw
  • Sandpaper (various grits, from coarse to fine)
  • Wood glue (optional, for adding a felt backing)
  • Felt pads (optional)

Instructions:

First, cut your chosen wood into 4-inch squares. Use a square to ensure accurate cuts. Next, carefully sand the edges and surfaces until smooth, working your way through different grits of sandpaper for a progressively finer finish. For a more sophisticated touch, glue felt pads to the bottom to protect your furniture. Finally, admire your handiwork—you've just crafted your first woodworking project!

Project 2: A Simple Shelf

Ready to tackle something a little more challenging? A simple floating shelf is a perfect next step. This project introduces you to measuring, cutting, and attaching wood pieces, building upon the skills you learned making coasters. A floating shelf adds a touch of elegance to any room, providing extra storage space. Consider using contrasting wood stains to further enhance the visual appeal.

Materials You'll Need:

  • Wood planks (two for the shelf, one for the supports – choose a length and width to suit your space)
  • Measuring tape
  • Pencil
  • Circular saw or hand saw
  • Screws
  • Drill
  • Sandpaper
  • Wood stain or paint (optional)

Instructions:

Begin by carefully measuring and cutting your wood planks to the desired size. Remember to account for the supports that will be attached to the wall. Use your drill to pre-drill holes for the screws to prevent the wood from splitting. Attach the supports securely to the wall using appropriate wall anchors (consider the type of wall you are working with). Finally, attach the shelf to the supports. Sand everything smooth, and add a stain or paint for a personalized touch. Now, you have a functional and stylish shelf!

Project 3: A Rustic Key Holder

This project is ideal for showcasing your creativity. Using reclaimed wood or even pallet wood adds a unique charm. It's a small project perfect for practicing your sanding and finishing techniques, and the end result is a practical and decorative piece. Consider adding hooks in varying styles for a more visually interesting key holder.

Materials You'll Need:

  • Reclaimed wood or pallet wood
  • Sandpaper
  • Wood glue
  • Metal key hooks
  • Screws or nails
  • Wood stain or paint (optional)

Instructions:

Begin by cleaning and sanding your reclaimed wood. Cut or shape the wood into your desired key holder shape (a simple rectangular piece works well). Carefully attach the key hooks using glue and screws or nails. Sand the entire piece to create a smooth finish. Add a stain or paint to protect and enhance the wood's natural beauty. Once dry, you'll have a uniquely rustic and functional key holder, ready to greet you at the door!

These three projects offer a solid foundation for your woodworking journey. Remember to prioritize safety—always wear safety glasses and use appropriate tools for the job. Most importantly, have fun experimenting and discovering your own style! Happy crafting!

Share:

How to Choose the Right Furniture Payment Plan for Your Needs

Furnishing Your Dream Home Without Breaking the Bank: Choosing the Perfect Payment Plan

So, you've finally found the perfect sofa, the dreamy dining table, or maybe even that statement piece you've been eyeing for ages. But then reality hits: the price tag. Don't worry, you're not alone! Many people need a little help financing their furniture purchases. That's where furniture payment plans come in. But with so many options out there, choosing the right one can feel overwhelming. This guide will walk you through everything you need to know to find the payment plan that perfectly fits your budget and lifestyle.

Understanding Your Financial Situation

Before even browsing furniture stores, it's crucial to get a grip on your finances. This isn't about stressing – it's about making informed decisions. Grab a pen and paper (or open a spreadsheet!), and let's get down to brass tacks.

Assessing Your Budget

How much can you realistically afford to spend each month on furniture payments? Don't just think about the minimum payment; consider your other monthly expenses like rent/mortgage, utilities, groceries, transportation, and any existing loans. A good rule of thumb is to keep your total debt payments (including this new furniture) below 30% of your gross monthly income. If you're already close to that limit, you might need to adjust your furniture budget or explore more affordable options.

Checking Your Credit Score

Your credit score plays a significant role in the types of payment plans available to you and the interest rates you'll qualify for. A higher credit score typically means better terms and lower interest. If you're unsure about your score, you can check it for free through several online services. Knowing your credit score empowers you to negotiate better terms or even improve your score before applying for financing.

Considering the Total Cost

Don't get fixated solely on the monthly payment. Always calculate the total cost of the furniture, including interest and fees. Some plans may offer low monthly payments but charge significantly higher interest rates, leading to a much higher overall cost in the long run. Compare the total cost across different payment options before making a decision.

Exploring Different Furniture Payment Plan Options

Now that you've assessed your finances, let's dive into the various payment plan options offered by furniture retailers and financing companies.

In-House Financing

Many furniture stores offer their own financing programs. These plans can be convenient, as you handle everything directly with the store. However, interest rates and terms might not always be the most competitive. Always compare their offers with other financing options before committing.

Retailer Partnerships

Some retailers partner with specific financing companies to offer customers a wider range of payment options. This can provide more flexibility and potentially better interest rates than in-house financing, allowing you to compare and choose what suits you best.

Third-Party Financing Companies

Companies like Synchrony Bank, Affirm, and Klarna specialize in providing financing for various purchases, including furniture. They often offer a variety of payment plans, including buy now, pay later (BNPL) options, which are attractive to those who prefer shorter-term plans with no interest if paid in full within the promotional period.

Credit Cards

Using a credit card can be an option, but proceed with caution. Ensure you have a good credit score and the discipline to pay off the balance in full and on time to avoid accruing high interest charges. Paying off the credit card promptly avoids the accumulation of high interest fees.

Personal Loans

For larger furniture purchases, a personal loan from a bank or credit union might be a more suitable option. Personal loans often offer lower interest rates than credit cards or some retailer financing plans, but they might involve a more rigorous application process. This requires careful budgeting and responsible financial management.

Choosing the Right Plan for You

The best furniture payment plan depends entirely on your individual circumstances and preferences. Here's a quick checklist to help you decide:

  • Your budget: Can you comfortably afford the monthly payments without compromising your other financial obligations?
  • Your credit score: Will your credit score allow you to qualify for favorable interest rates?
  • The length of the payment plan: Do you prefer a shorter-term plan with higher payments or a longer-term plan with lower payments?
  • Interest rates and fees: Compare the total cost of the furniture across different plans to find the most affordable option.
  • Payment flexibility: Does the plan offer options for making early payments or changing your payment amount?

Remember, it's perfectly okay to shop around and compare offers from different lenders before committing to a payment plan. Don't rush into a decision – take your time, do your research, and choose the plan that best suits your needs and financial situation.

Commonly Asked Questions

Here are some frequently asked questions about furniture payment plans:

Q: What if I miss a payment?

A: Missing a payment can result in late fees and a negative impact on your credit score. Contact your lender immediately if you anticipate any difficulty making a payment to explore options like payment deferrals or hardship programs.

Q: Can I pay off my furniture early?

A: Most furniture payment plans allow for early payoff, which can save you money on interest charges. Check your agreement for any prepayment penalties before making an early payment.

Q: What documents do I need to apply for a furniture payment plan?

A: Typically, you'll need to provide proof of income, identification, and possibly a credit report. The specific requirements vary depending on the lender and the amount of financing.

Q: Are there any hidden fees?

A: Always carefully review the terms and conditions of any payment plan to understand all associated fees, including application fees, late payment fees, and prepayment penalties. Don't hesitate to ask questions if anything is unclear.

Q: How long does it take to get approved for a payment plan?

A: Approval times vary depending on the lender and the type of plan. Some plans offer instant approval, while others may take a few days or weeks.

Choosing the right furniture payment plan is a significant decision, but by following these steps and asking the right questions, you can confidently furnish your home while staying within your budget.

Share:

DIY Outdoor Furniture Plans for Your Patio

Transform Your Patio with DIY Outdoor Furniture

Tired of the same old patio furniture? Yearning for a unique, personalized outdoor space that reflects your style and doesn't break the bank? Then unleash your inner craftsman and build your own! This guide provides detailed plans and inspiration for crafting stunning DIY outdoor furniture, turning your patio into a haven of comfort and style.

Choosing Your Project: From Simple to Sophisticated

Before you grab your tools, consider your skill level and the time you're willing to invest. Beginners might find success with simpler projects like a charming pallet coffee table or a basic Adirondack chair. These projects require fewer tools and techniques, providing a satisfying introduction to DIY furniture making. More experienced builders can tackle challenging projects like a modular outdoor sofa or a stylish picnic table, showcasing their advanced woodworking abilities and creating truly impressive pieces. Don't underestimate the power of a well-executed simple design; sometimes, less is more.

Beginner-Friendly Projects:

  • Pallet Coffee Table: Repurpose old pallets into a rustic and trendy coffee table. Sand the wood, add some wheels for mobility, and finish it with a weather-resistant sealant.
  • Adirondack Chair: This classic design is surprisingly easy to build with readily available lumber. Numerous free plans are available online.

Intermediate & Advanced Projects:

  • Modular Outdoor Sofa: Create a customizable sofa by building individual modules that can be arranged and rearranged to suit your space. This requires more advanced joinery techniques.
  • Picnic Table: A sturdy and functional picnic table is a great addition to any patio. You'll need precise measurements and solid construction skills.

Gathering Your Materials and Tools

The success of your DIY project hinges on having the right materials and tools. Create a detailed shopping list based on your chosen plan. For wood, opt for pressure-treated lumber or cedar for superior durability against the elements. Don't forget essential hardware like screws, bolts, and washers. Invest in quality tools, even if you're renting; this will ensure clean cuts and precise assembly. A well-stocked toolbox should include a measuring tape, saw (circular saw or hand saw), drill, screwdriver, sander, clamps, and safety glasses. Consider adding a planer if you're working with rough-cut lumber.

Building Your Masterpiece: Step-by-Step Instructions

Once you've gathered your materials and tools, follow your chosen plan meticulously. Take your time and double-check measurements. Start with a clean workspace to avoid accidents and ensure efficient progress. Pre-drill holes before screwing to prevent wood splitting. Apply weather-resistant sealant or paint for protection against the elements. Remember that patience is key. Enjoy the process of creation; celebrate small victories along the way! Take breaks when needed and don't rush the finishing touches.

Finishing Touches and Maintenance

Once your furniture is built, add the finishing touches! Consider adding comfortable cushions, throws, and outdoor rugs to complete the look. Regular maintenance is crucial for extending the lifespan of your DIY furniture. Clean it periodically with mild soap and water. Apply a fresh coat of sealant or paint every year or two to protect it from the sun, rain, and snow. With proper care, your handcrafted outdoor furniture will provide years of enjoyment, becoming a cherished part of your patio oasis.

Share:

Search This Blog

Powered by Blogger.

Recent Posts

Theme Support